This page is for non a/c experts who are hot and sweaty.
Change from R-12 to R-134 click here...

If you own a van with dual units both front and rear then do not use R-134 as a replacement refrigerant it will not work well, if at all....
This page is also for persons that enjoyed being able to recharge their vehicles by themselves back when we were able to get refrigerant R-12 at the local auto store.
Well now you can buy the little cans of refrigerant over the counter again, but it is R-134. Its better than nothing.
If you have the time read Jbabs air conditioning help page to understand what the freon does in an a/c system. Air conditioning works the same no matter what the applicatiion. auto, home, commercial, freezer, refrigerator,, ect..
If you want to change from R-12 to R-134 then page down this page for info.
Lookin for the R-134 pressure chart click here...
The so called oil change and O-ring change required...
I have seen and done a lot of vehicles without the oil and o-ring change, just the refrigerant was changed and wah-lah none of them has failed even after 4 years. Many people get worried about this because of what they have heard or read. I along with friends also in the ac trade say they have not had any failures do to the oil breakdown.
If your system had needed charging a half times a year or so do to a leak than add "2 ounces" of R-134a oil in a pre charged can to replace any lost oil do to leaking.
Most of you will not have the massive load of tools for a/c work but have no fear you and I should be able to figure out how to get that a/c cooling even if all you have for tools is a screwdriver, pliers, and a butter knife.
Auto air conditioners that are barely working or working but not quite as well as before are simple a/c's to fix, usually they need freon added.
Sometimes when the a/c isn't running well and adding freon doesn't help then it can be hard to figure out.
The most common problem is that the refrigerant (Freon) leaks.
When the system does leak, the first thing that happens is the a/c does not work well when you need it the most (hot!! summer day). At night it will work better. What causes this is a pressure sensor that turns off the compressor if the pressure drops below the pre-set setting of this switch.
The low side of a working car a/c should be around 40psi. when the outside temperature is hot (summer).
As the system looses more and more freon the low side pressure will drop more and more. The switch will cut off the power to the compressor when the pressure drops to about 25-30psi.
When the compressor stops the high pressure side will bring the pressure up as the system equalizes. The switch will sense the pressure rise in which the compressor will come on again. Then it starts over again.
The less freon there is the more the switch will turn the compressor off/on/off/on ect.. After a certain point the a/c will not work at all.
This low pressure switch is there to 1: Regulate the compressor. As the temperature of the air in the car gets cooled the pressure on the low side drops, if you run the a/c with the fan on low the cold coil can get so cold the water condensat will freeze up the coil. 2: The switch will keep the compressor from running if the system gets low of refrigerant.
Some vehicles use a switch on the high pressure side, it does basically the same thing. Except it senses the high pressure and will shut down the compressor when the pressure goes to high or to low. For Saftey.
If you take the time to read through what I have posted on this site you should gain enough information to help you figure out why your a/c is not working, if you have any mechanical ability it should not be to hard to pinpoint the problem. If you are petrified of the thought of air conditioning trouble shooting then go to my vehicle air conditioning check list . This will only help to figure out what may be wrong but you will still pay dearly to have someone else do the repair.
The topping off of an R-12 system that needs a small amount of R-12 freon is the same as fillng the system up with R-134. When you connect the R-12 can or jug to the fill hose or gauges you then must connect the hose to the low side of the ac. After doing so add the freon slowly until the aluminum tubing that connects to the compressor starts to sweat (drip water). Feel the tubing at the compressor by hand it should feel very cold, like an ice cold soda out of the refrigerator. When the low side tube is cold and sweating your done charging/topping off the system. Be sure not to put in so much freon that the compressor starts to sweat. Only the tubing that connects to the compressor should sweat. (be sure not to touch the high side tubing coming out of the compressor as it can burn you). If you have gauges then the low side reading on a warm day should be around 40 psi.

If you find you do have the most common problem a leak, look for an oil stain on the tubing, there will be a dirty oil stain where the leak is, this is because there is oil flowing around with the freon. If your looking for a leak check all the hose connections, and the connections to the coil up front and the compressor, look for the oil stain as described above.
Chances are your vehicle uses R-12 refrigerant, you can check by looking at the stickers under the hood. If thats the case, and your vehicle has a slow leak I recommend going to an auto store and pick up the kit to change your freon from R-12 to R-134, R-134 is now available over the counter. You must get the kit because the R-134 cans have a special adapter valve you must install on top of the original access valves (the fittings where you connect the hoses for service) on your system.
YOU DO NOT- use the same amount of R-134 as you do R-12 as the refrigerants have different molecule sizes. Use 80% of the R-12 charge.
R-12 is no longer being produced because of the so called ozone depletion. It is still available but expensive about $20 to $30 a pound. R-134 is less per lb. Now the R-134 is not quite as effecient as R-12 but it works quite well. There are many other gases on the market now. These 2 that I list work much better than the R-134a from what I have experienced. These are "Hot Shot R-414b" Also the refrigerant "Enviro-Safe R-ES-12a"
If you would like to change the gas from R-12 to R-134 something you can do yourself now that you can buy the little cans again, Read below for help.
Working on pressurized refrigerant systems is dangerous so do it at your own risk.
To change to R-134 you will need.
1-- Kit with fittings
2-- 2-3 cans (12 oz.) of R-134
3-- 1 hose kit with the adapter to fit on the R-134 cans, and also connects to the vehicles ac system (low side).
4-- A big bowl of hot tap water.
Before being able to charge the vehicle the R-12 needs to be removed. In the old days you could just depress the valve to let what is left of the R-12 out. It is like letting the air out of a tire. But that is against the law. Your supposed to have the R-12 vacuumed out (recovered).
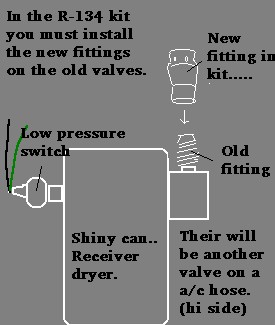
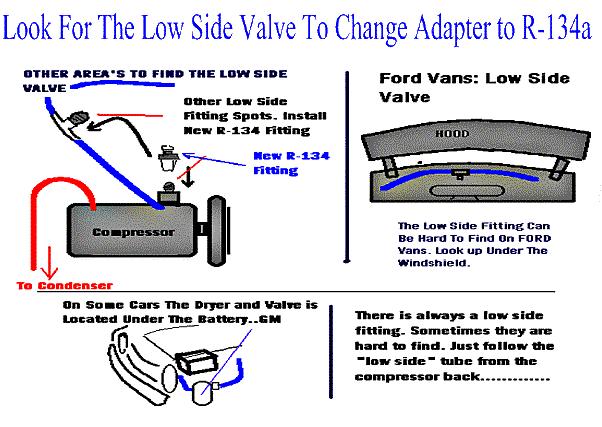
Install the new R-134 fitting on the "low side". The R-134a kits come with 2 134 adapter valves. A question that is often asked is "Which adapter do I put on the low side"? or "How do I make sure which one is the low side"?
The 134a fittings will only fit on the exact old fittings. They are different sizes. You cannot get them wrong. The old R-12 low side fitting is a 1/4 inch flare fitting. The high side is a 3/16 inch flare fitting. So the new R-134a fittings only fit one way. The larger of the two is the low side.
The R-134a cans fill hose will only fit one of the fittings, that is the low side. You cannot get this wrong.
If your vehicle is equipped with a shiny can "accumulator & dryer bag" then the valve on the can is the low side. See image below.
WARNING: Your vehicles a/c system will not need every bit of 3 cans. The reason I put 2 to 3 cans of R-134 is that most vehicle a/c's actually fall between needing 1_1/2 to 3 cans.
Read the instructions on how to connect the new fitting on the low pressure side. This new fitting will now allow the R-134 hose to connect to the vehicles a/c.
Now read the instructions on how to connect the hose to the freon can.(The kit will have a connector that fits on the top of the freon can)
You should now have a full R-134 can connected to the hose.
Next, tighten the "T" tap valve by turning it clockwise. Keep turning the T valve until it stops tightening. This pokes the hole in the can to let the freon out. Now open the valve slowly untill you hear gas coming out of the hose on the can. The reason I want you to do this is to push (purge) the air out of the yellow filling tube on the can to keep you from putting air in the system.
At this point you are ready to gas up.
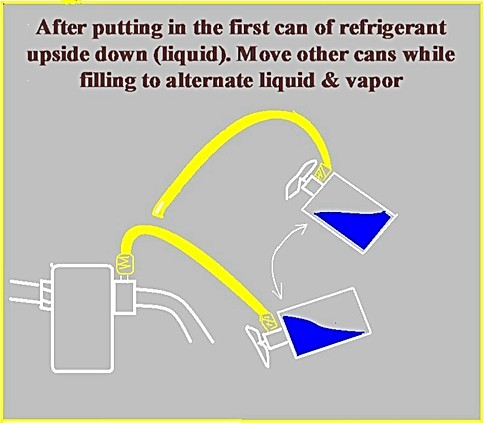
If you bought a then you may be confused by the directions on the kit. If I remember correctly it states to put in the first 2 cans upside down. I dont like beginners shooting liquid freon into systems. If you want you can shoot in the first can upside down, *be safe*.
After purging the air out of the hose connect the hose to the new fitting on the low side.***see image below***
Start the engine then set the a/c on hi cool and hi fan!. Keep the passenger door or windows open!.
Watch the water temp gauge on the engine you dont want to overheat the engine while doing this.
Now with the engine running and the a/c set on hi-cool/hi-fan turn this first can upside down. Open the valve on the can and let the liquid freon in slowly (dont be in a hurry!). After some of the freon gets into the system the compressor will kick on and off. This is normal. Keep slowly adding the freon until the can gets empty.
Now that the can is empty disconnect the fill hose from the a/c. Then unscrew the 1 st can of freon (there will be pressure left in the can so dont be alarmed). Now screw the second can onto the "Tap". Then turn the tap clockwise until it stops again. Now the second can is ready to be connected. Put the hose on the low side fitting. But this time do not turn the can upside down. Open the "T" valve slowly to let the freon in again. With the freon can being up the outside of it may freeze. So as the gas is leaving the freon can you can shake the can while it is filling. When the can gets real cold this is where you dip the can into the hot tap water. Doing this will keep the pressure up in the freon can while its filling.
Getting the refrigerant (Freon) charge is the
most important and hardest thing for you to get correct. The best
way to tell is by hand. Find out which aluminum tube that is connected
to the compressor is the low side. The low side aluminum tubing that
enters the compressor is what you feel. "BE CAREFUL NOT TO GRAB THE
HIGH SIDE ALUMINUM TUBE THAT EXITS THE COMPRESSOR AS IT CAN BURN YOU"
Keep adding freon while you feel the tubing. You will keep adding
freon until the aluminum tubing gets cold and sweats.
The a/c will be correctly filled when the aluminum tubing that connects
to the compressor will be cold and sweating. Like an ice cold
soda can. The compressor itself should NOT sweat!! If you overcharge
the system the compressor will sweat and by now you should know that
just the low side tubing entering the compressor should be sweating.
Now you can only feel the aluminum part of the tubing not the black
rubber.
If you have gauges the low side at idle on a hot day will be about 40-50psi.
That is all there is to it..
I will go over it again quickly... Start with no pressure in the auto's a/c, then put on the new valve in the kit over the old valve (low side) on the shiny can if your car has one. Then start the engine and put the a/c on hi cool with the fan on hi, open the doors or windows then connect the first R-134 can to the fill hose, turn the "Tap" valve clockwise until the can is punctured. Then open the valve to let some freon out of the can, this will push (purge) the air in the hose out. On the first can turn it upside down. Connect the hose to the new low pressure side valve (these are pop off type valves like an air compressor uses). Turn the first can upside down. Let the liquid in by opening the "T" valve slowly. This will allow liquid freon in slowly. After letting in the freon the compressor will come on and off, this is normal. As you add more and more freon the compressor will stay running. keep adding gas until you have a very cold and sweaty low side aluminum tube that connects to the compressor. DO NOT OVERFILL, overfilling will make the compressor sweat, also the pressures can go dangerously high.
To see how the refrigerant (Freon) changes state, liquid to gas. This is what makes air conditioners work. Its the same with all a/c's go here....
FREON R-134 IS NOW AVAILABLE TO ALL AT AUTO PARTS STORES

Go to home air conditioning help
Go to home a/c electric wiring help
You are the visitor, thanx.
 For any comments write to jbabs714@verizon.net.